Friday, August 31, 2018

CINDERELLA'S SLIPPER: THE 401's PULLEYS AND FAN BELT


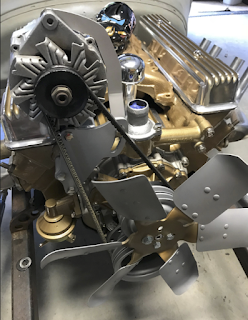
Thanks to a little luck and my nailhead parts stash, I discovered that I had matching three-groove nailhead crank and water pump pulleys to replace my misaligned single-groove units.

With the Alan Grove custom Alternator bracket installed, I attempted to measure for the proper V-belt and missed by roughly a mile. After taking fan belt measurements in the most logical way imaginable using a length of string, I discovered I don't know dick about measuring for a fan belt.

I consulting the Alan Grove instructions that came with my brackets and it recommended
a size range from 51 & 1/2" - 52 & 1/2".

I went to my local Advanced Auto and ordered three sizes.

And the winner is...


The Gates 52 & 1/8" PN 11A1310 or 7516


I've now got my alternator, water pump and crank pulleys in close-to-perfect alignment. I also detail painted the fan in silver and universal gold to match the engine and utilized a fan extension, Now the only thing left is to contact the fine folks at Alloyboltz.com to get four of their stainless steel polished bolts to replace the bolts that came with the kit.

I'm looking forward getting the over to Mercury Charlie's to finish the floors and getting on with the build.  Cooling system, brakes, driveshaft, transmission, and installing a wiring harness still needs to be done.

We have miles to go yet, but I'm happy with the progress. Onward!


Monday, August 13, 2018

PULLEY MEASUREMENTS AND ALTERNATOR MATH

With the new water pump and timing cover mounted, I find myself one step forward but two steps back. My stock single V-groove water pump pulley and my stock single V-groove crank pulley aren't in alignment. With both mounted, my water pump's pulley sticks out 3/4" of an inch further than my crank's pulley.

For the sake of discussion, I took shots. And measurements.


6&3/16" across, holes are 1/2" and 3/8" across, center opening is 3& 1/4" across.
]This is its face.] 


Water pump pulley is 6& 3/4" across.


Crank Pulley is 1 & 1/8" deep.


Water pump pulley is 1&9/16" deep.s


A quick measurement of my water pump pulley revealed that my top pulley (WP) is 1 & 1/4" inch deep. And a Part Number: 1368358. If my calculations are correct, that means a 2" deep GM single V-groove pulley is what I need to have both single V-groove pulleys in alignment.

Then it occurred to me. With my new Alan Grove alternator mount (PN 240-R) now in place, I really need to mount an alternator before I solve my pulley-alignment conundrum.

That way, all my pulleys will be in place and I'll be able to take proper measurements and determine whether a nailhead multiple-grove pulley (two or three) is the appropriate fix, or whether I can pull off getting three single-pulleys in perfect alignment, which would be the cleanest scenario.

So off I went shopping for a quality alternator, leading me to Powermaster alternators and numerous options. After comparing their most expensive PowerGen, the alternator that looks like a generator. Nice product, but I had three problems:

I: I can't afford it to pay multiple hundreds of dollars for an alternator, no matter how stealthy and period-correct it looks.

II: The PowerGen appears to have a differnt mounting system that my new Alan Grove bracket.

III: With the 6X2 Eelco intake on the docket as my final intake of choice, the PowerGen's depth
appears to put it back further back towards the engine in what I'll refer to as "The Interference Zone".

As much as I'd love to have an alternator that looks like a vintage generator, I don't need to take expensive risks.


Nobody wants an expensive part that interferes with an even more expensive part. That's how projects end up staying projects. So with my custom alt bracket and making everything fit in mind, I
looked for the most aesthetically pleasing solution.

A drum roll, please...

Ladies and gentlemen, I proudly present the PowerMaster 12si, a 150-amp, single-wire alternator available in a variety of finishes including chrome, polished, and black, and what you see here, which is called their natural finish. An alternator that uses the stock mounts will make beautiful music together with my Alan Grove bracket. At least that's the hope.

Given all the work I've just performed to make my open engine compartment a thing of beauty, I went back and forth considering finish, but ultimately decided the "natural finish with gold post" best matches the gold and aluminum look I've got going.

As sexy as the chrome and polished alternatives sound, I think a natural finish with a few coats of VHT clear, will get me to heaven.

So there you have it. the next spend on my endless list to Tall T happiness.


The other option is the "smooth look" 12si (150-amp) option, which is more expensive but probably the cleanest looking set-up and therefore the one I'm most likely to go with.


What started as a pulley dilemna, is now an almost two hundred dollar alternator. It never ends.


Saturday, August 11, 2018

ALAN GROVE BRACKETS, HURRAH!


It's nice when a part arrived with detailed instructions that are actually detailed and instructive.
Case in point, the paperwork that arrived with my alternator mounts purchased from Russ Martin, at Nailhead Buick. Russ has been patient and answered a lot of question, and so far, everything I've purchased from him has been of the highest quality. My Alan Grove alternator mount,  PN 240R being no exception. It's set up to mount the alt on the upper passenger side, so that the alternator is as far back as possible.

The Alan Grove part when in like butter, and except for the fact that I'm swapping out the bolts for polished stainless steel pieces from Alloyboltz.com, everything went in perfectly. In fact, that's proof of a great instruction sheet with 100% accurate diagram.
I've even breaks out the nuts and bolts and specifies exact size bolt sizes and including specs for the  washers. I've got Alan Grove mounts on my stroker motor in Ratiki, my '65 Suburban, and once again I must say I'm impressed. Particularly with how detailed the instructions were, which made installation a breeze and ordering polished stainless steel replacement bolts and washers a walk in the park.

We aren't out of the woods yet, though as we still have the alternator to mount and the pulleys to line up. PResently, my crank pulley and water pump pulley are having a 3/4" disagreement. But that's a problem for another day, and Russ Martin and I are working on the solution.

e're getting closer

Sunday, August 5, 2018

INTERIOR COLOR STUDY

With the engine color figured out, now's a good time to see what interior options exist in the same gold as the engine color.  Tina @ A Stitch in Time was good enough to ask her suppliers to provide a few lighter gold color samples.

The good news is we're batting two for three.

I'm really digging the brighter choice, which has a little more pop to it. Funny, because that's the opposite way I arrived at the Universal Gold VHT high-temp paint I chose for my nailhead engine.

It was the lightest and subtlest engine color I found and to me, felt more early-sixties than the oranger and blingier high-temp engine paints I tried. Universal Gold was the third paint I tried and three being a charm, that's where I landed.

None of my local auto parts stores carried it, which is surprising to me, as it's a dead match for the sixties Oldsmobile V8s.

So I guess now my Ford now has a Buick motor in an Olds shade. Onward. And the interior is no headed in the same direction. We're still looking at options, including clothes and brocades, but if we go there, you can bet it will be judiciously. A little goes a long way in such a small interior.


.